Awesome so we have made it this far in the current series of posts, it’s not an easy one to write and I know it’s not easy to read, now that we are at the last steps of the installation stage, I am even getting a little tired of doing it. So as a quick overview of what will be coming up in the next few months:
- New Network infrastructure (I had to bring in help for this as well)
- Unifi Cloud Key and its Limitations
- Unifi SDN and Unifi Video and why I have them hosted virtually in Ubuntu
- New CCTV infrastructure
- New Server and why the Mac Mini couldn’t keep up
- Future server builds (am I moving away from Apple?)
- Parallels Desktop Pro
- Building your first Active Directory Domain
- Securing Servers (This is going to be a series looking at Firewalls, Networking GPO’s etc)
- PKI Active Directory Certificate Services
- Microsoft Server 2019
Microsoft SCCM 2016 deployment (this is going to be a big one people)- How to set up an Ubuntu Unifi Controller and Video server
I am also trying to get the posts to flow a little better than in previous years. with that said enough waffle lets get on with the install.
SCCM Install
- You will need to mount the .ISO of SCCM Current Branch, the layout will look something like the one below

- Double click on the Splash HTTP Application and this will bring up the welcome screen

- Click install and read the information on the first page carefully if it is your first time (much like anything if it’s your first time go slow 😉 ) when ready click next

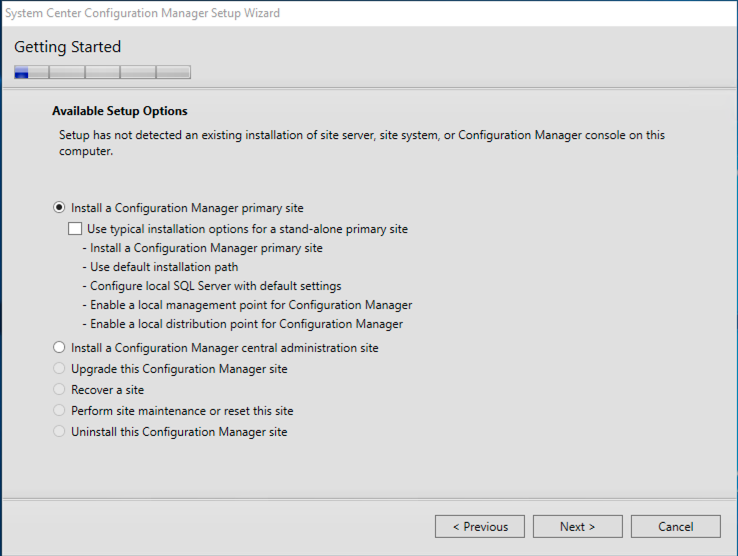
- As we are going to be installing a primary site as it is the first in this environment We are going to select Primary Site and then click next.
- On the next screen, enter your Licence information and select the date of your Software Assurance (as per your Agreement), if you are installing in a POC then you can install the EVAL edition.

- The next scene you will need to accept the Licensing agreements
- At this point and further pre-requisites will automatically download, such as program updates, you will need to set the path to a local directory (you will also be able to point to this directory should you need to re-do this at a later stage

- The installer will go and download all of the files required for the install, this can take some time depending upon your internet speed (coffee?)

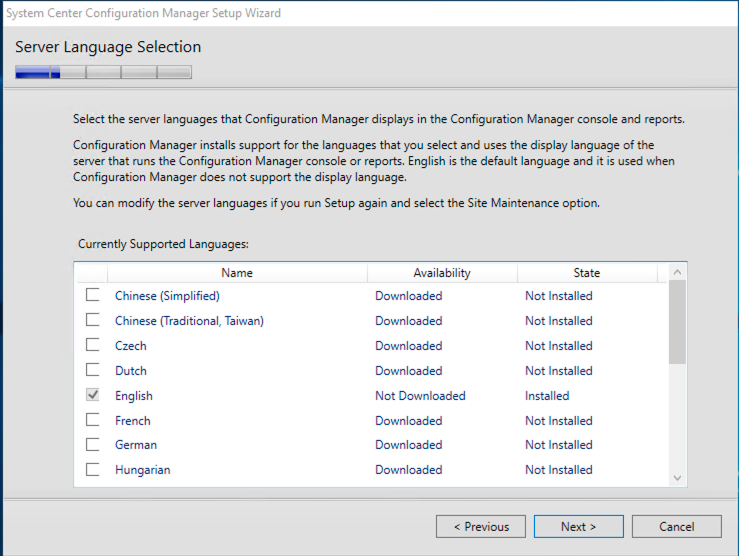
- Select the supported install languages
- The next page is important and should be entered with care as this will set the site code and Site Name, this will help in identifying the site later during the configuration stages

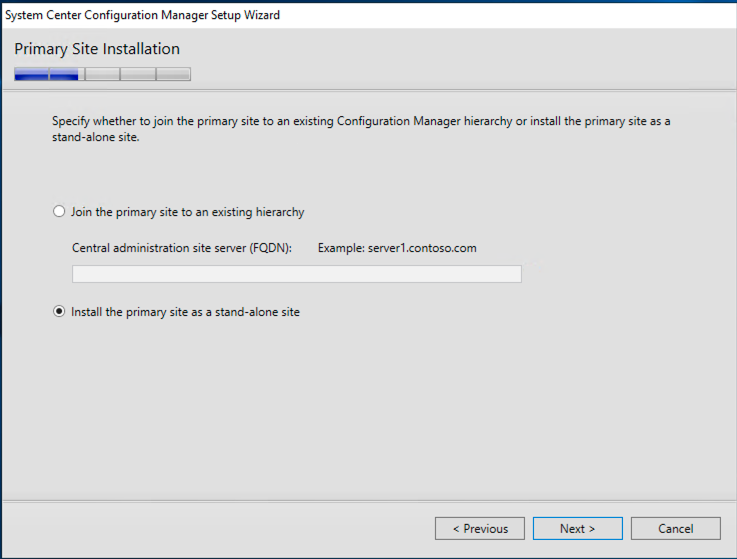
- On the next page, you can join the site to and existing hierarchy, as this is a new install the option to install as a stand-alone is the one that is required.
- Enter the SQL Server name and the instance name. If you don’t change the instance name during SQL installation, then you can leave blank for defaults.

- On the next screen: specify the path to the SQL Server data and log files. Now you must specify the server where SMS provider will be installed:

- On the next page is where you are required to set the Management Point and the Distribution Point for the primary site server.

- The management point is the primary point of contact between Configuration Manager clients and the site server. Management points can provide clients with installation prerequisites, client installation files, configuration details, advertisements, and software distribution package source file locations. Additionally, management points receive inventory data, software metering information, and status and state messages from clients.

- System Center Configuration Manager uses distribution points to store files needed for packages to run on client computers. These distribution points function as distribution centres for the files that a package uses, allowing users to download and run these files, programs, and scripts when a package is advertised.

- Due to SQL Mixed Mode, the prerequisite check will show a warning message this can you can safely ignore.

- Click Begin Install
- The install can take a considerable amount of time, whilst this is doing its thing you can grab a coffee and do other things (its at this point Set moved his mouse to click a button on the TouchBar of is MacBook Pro 🙁 )

For me the total time that it took for SCCM to be installed took 1 hour 57 minutes, not a bad time, I have seen this take several hours, this is why I try and get it to the install around 13:00 so that I can go off and get the other servers OS Build started and updated (I generally say 2 at a time with a Max of 3).
SCCM updates
The first thing that you must do on a new installation is get all the latest updates, as this will be the rest of your afternoon.
- So you should now have an SCCM Folder on the Start Menu

- Launch the SCCM Console (If UAC is a problem in your environment the use the “Run as Administrator” option)

- If you have not downloaded the latest version of the SCCM ISO then you should now go to the updates and servicing section and download and update to the latest version.

- As you can see from the above I have 3 updates to download, check and install
- the first step is to download the latest (in this case it is 1810) but right-clicking the update and selecting download

- Once this has completed you can and should do a Pre-requisite Check to ensure that it won’t fail (actually it still can just less likely to), especially if this is in a production environment, so right-click the update and select Run Pre-requisite Check.
- You can check the status of the check by selecting the update and then selecting show status
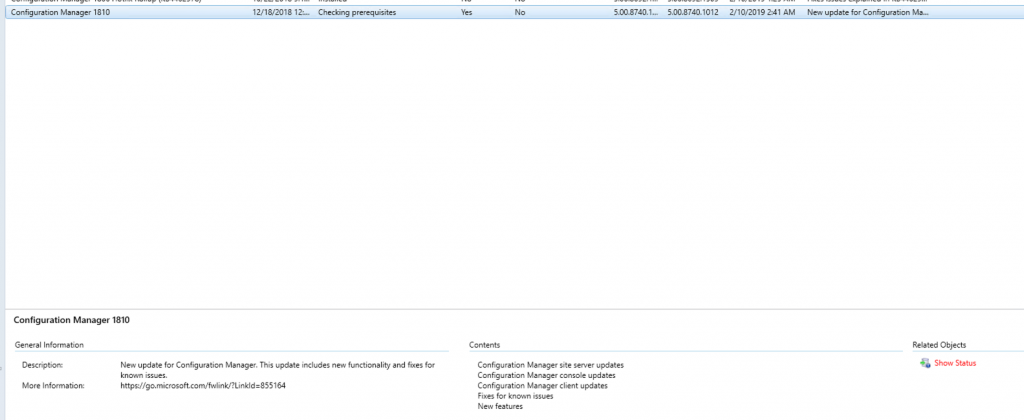
- Then you have to click the show status on the top bar which will bring up the current status of the update, depending on the size of your deployment and link speeds this can take a considerable amount of time, as its a pre-requisite check I would do this overnight and let it do its thing.

- Once the Pre-Requisites have completed you may get a few warnings, such as the one that I have here

- Having checked and resolved the warning (in my case this isn’t an issue, I checked my DB’s have TLS 1.2 so nothing to do). Then you can go ahead and run the update.

- Once this comes up you can elect to ignore any warnings, I don’t and wouldn’t recommend that you do.

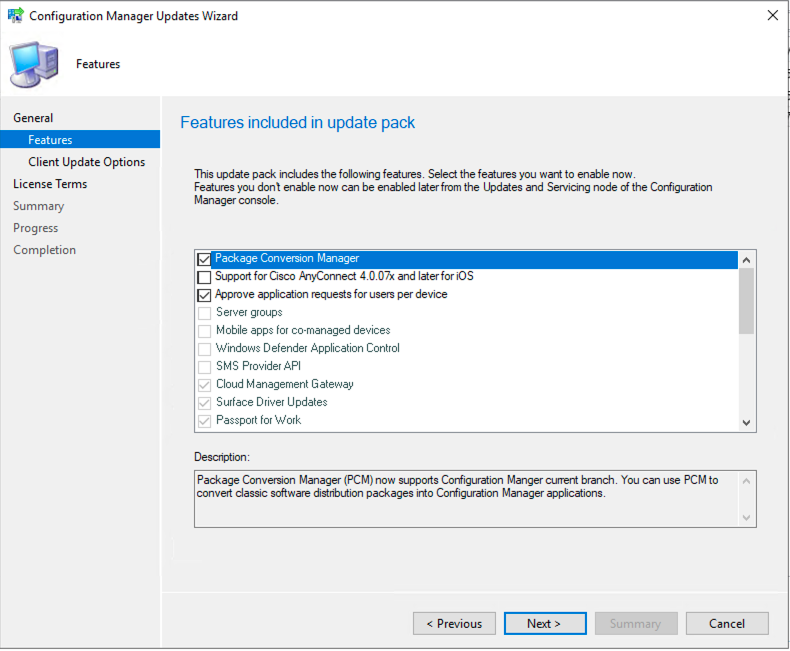
- On the next page you can select any new features to enable
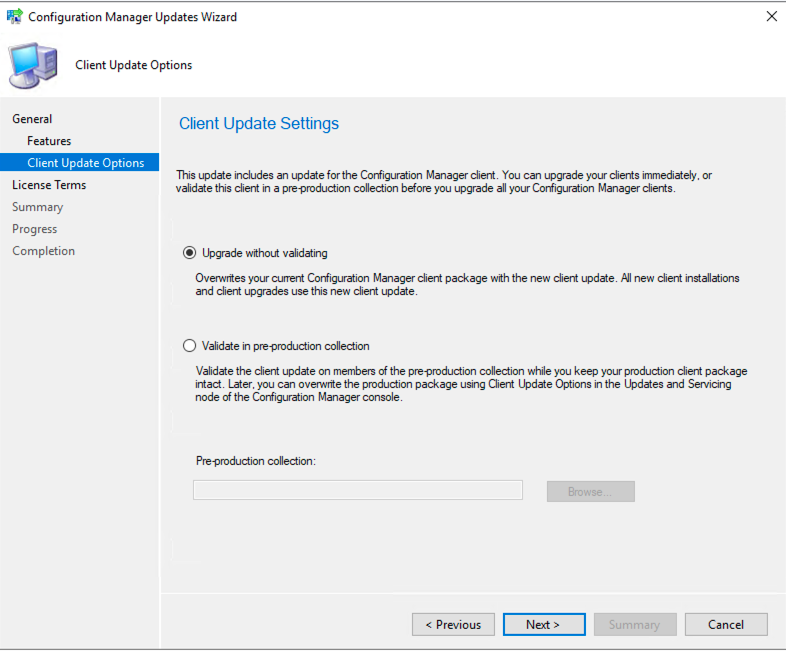
- The next page, the default is to upgrade without validating, as we have run and corrected any warnings from the pre-requisite check, carry on with the default
- Accept the licence terms (amend the Software Assurance if needed

The check the Summary and click next to continue, and then finally close
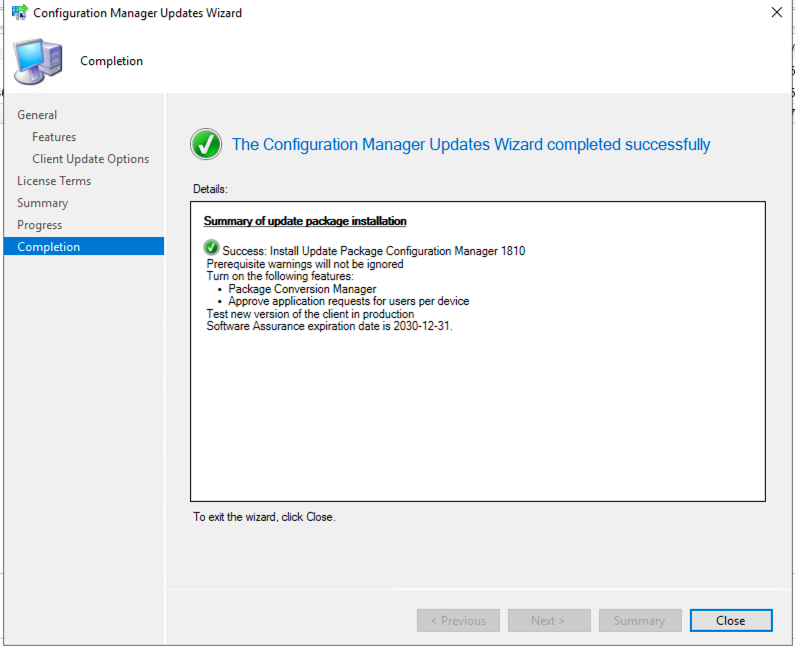
- Now it will go off and install the update package, you can check the status just like you did for the status of the pre-requisites, you can also load up the man.log in cmtrace.exe if you want to follow it in real-time

- One thing to note after every Update, you will need to update your administration console, its a pain in the backside but doesn’t take long.
SCCM SUP Configuration
So this is the last configuration Item to get you going, as this is the longest part of it, and can take a couple of days its worth doing early on. In future posts we will look at the administration tasks and really get down into the nitty-gritty of the service, but for now lets just get the System Update Point setup and synchronising.
I am going to ignore the fact we have already installed the WSUS Components, and re-go over this here for clarity and so you don’t have to flick back 🙂 .
Because this is already a Primary Server, certain roles are already installed.
- Required roles:
- Software update point
- Windows Server roles and features:
- .NET Framework 3.5 SP1 (or later)
- .NET Framework 4.5.2
- The default IIS configuration is required.
- Windows Server Update Services:
You must install the Windows server role Windows Server Update Services on a computer before installing a software update point.
- Open Server Manager>Manage>Add Roles & Features, select update Services

- Under Features, ensure the default .Net Framework 3.5 and 4.6 have been ticked.

- Click next on the page after as it just gives you the basic information of what WSUS is

- On the next page this is where you need to untick the WID Connectivity and enable SQL Server as we have SQL installed on this server anyway so we don’t need the Windows Internal Database.

- Here we need to configure where WSUS will create its directory. It will be set up to store it on a separate drive in a WSUS folder.

- Enter the FQDN of your SQL Server and click Check Connection

- On the next page click on install if the summary is all correct, if not, go back and correct.

- When complete you will get the confirmation screen

So now we should be all caught up from the section of part 2 where I got you to install WSUS, this is for the people like me who are too lazy to open it up and run through that portion of the install 🙂 . so now we can actually get on and configure the WSUS service..
NOTE: – I am going to do this in a way that not many people have seen before or will again, I can’t even remember where I got this information from but I have been setting up WSUS for use with SCCM in the same way since SCCM 2007 and it has never let me down yet, so if you are reading this and its your method from 12-13 years ago, thank you from the bottom of my coffee infused heart you have saved me so much pain and agony over the years. The fact I am sharing this is kinda doing myself out of a job as well. Not once has this method failed and yet it goes against Microsofts best Practices that has caused me so many lost hours and pain.
From this point on I would advise you take it slow, read my words and look at the pictures as we are only going to run part-way through the WSUS setup and then exit out of the configuration, read it twice, then follow on with me, and I promise you will never have any pain again with the WSUS and SUP configuration.
- Click on start and navigate to the Administrative Tools folder, and you should now see that Windows Server Update Services icon has appeared, click this

- On first click it will ask you to perform the setup, click next

- On the next page, read this at your leisure (has anyone ever read this?), either allow or deny the Improvement Program

- On the next page Allow the default to connect to Microsoft Update

- On the proxy, you can either set this up if it is required to have a username and password or leave the defaults, click next

- On the next page, click the start connecting button and let it run its course, when complete click next

- Ok so you should now get to the point where the updates have downloaded for WSUS and you will get a solid green bar, click next and from now on proceed with caution

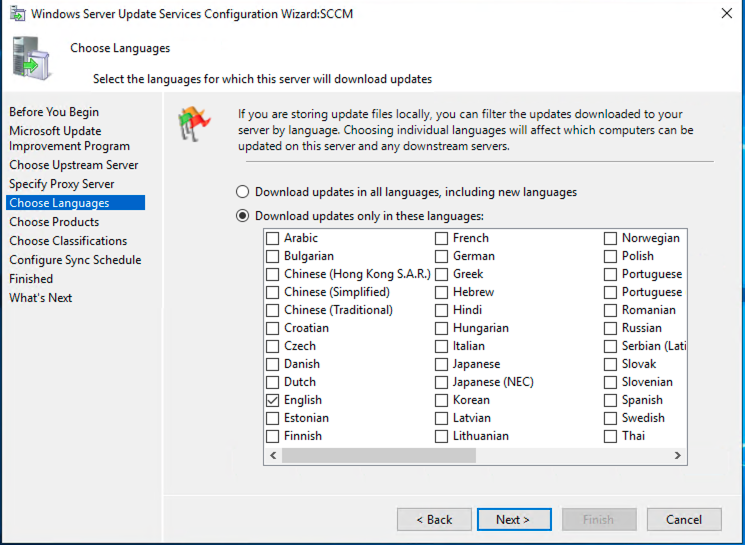
- On the Language Selection, leave everything DEFAULT and click next
- On the Product selection page again leave everything DEFAULT

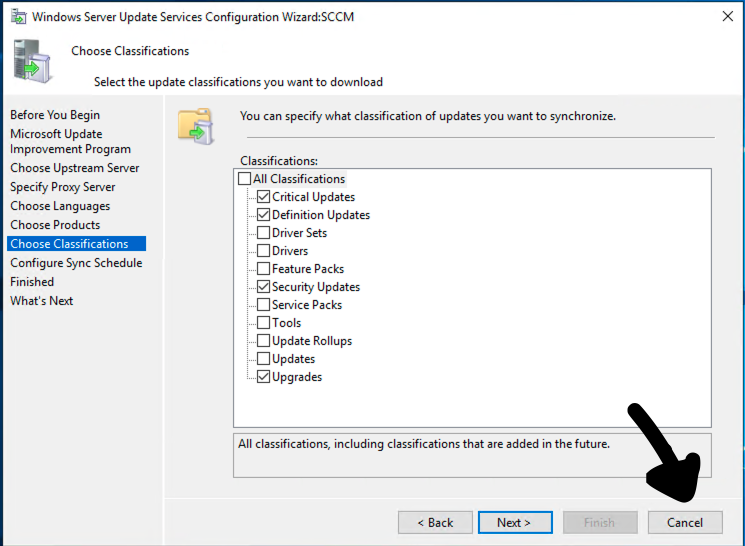
- Now you should be at the classifications page, leave Everything DEFAULT and click CANCEL
This is all you should ever need to do in the WSUS console itself, outside of any maintenance tasks. Close down the WSUS Console if it pops up and prepare for the rest of the configurations.
Extra Configurations
A couple extra tweaks to the standard config ensure a successful WSUS distribution.
- Folder Permissions
- Navigate to the source directory you created earlier.

- On the Permissions for E:\WSUS, add the following accounts with Full Control;
- SCCMAdministrators AD group
- Network Service
SCCM Administrators Group is an Active Directory group containing the SCCM Network Service Account, and the Machine Accounts for each Site Server.

- A level down on the W:\WSUS\WSUSContent folder, ensure your permissions logically match the below. Double check the SCCMAdmins and Network Service have inherited down.
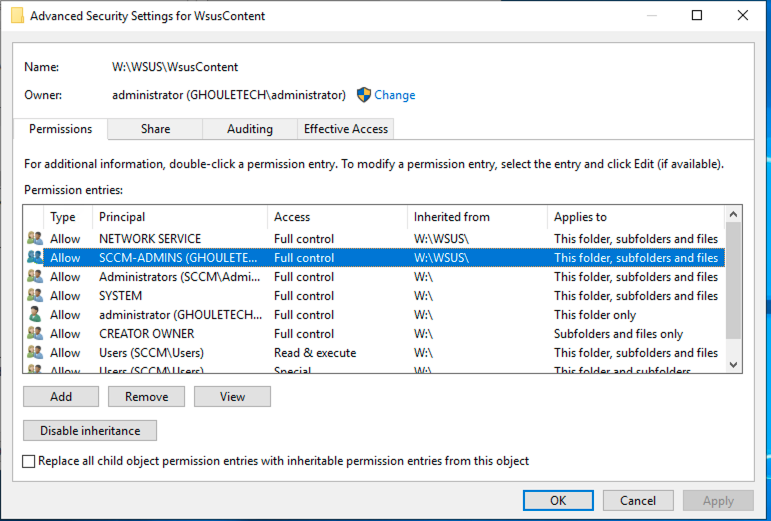
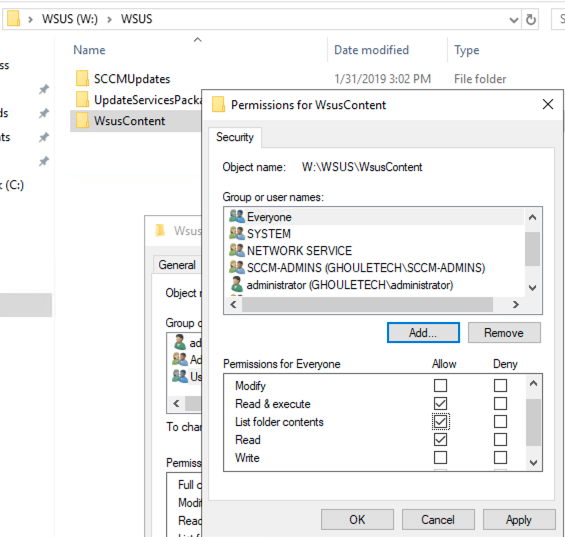
- Now make sure that everyone can at least read the W:\WSUS\WSUSContent is able to read the contents of this folder
- Now we need to create a new folder called SCCMUpdates
- ensure that SCCM-Admins and Network Service have full control rights

- Now we need to share this folder

- Ensure that the permissions match the NTFS file permissions. no real need to remove the read rights for everyone, as it’s not really useful for people to be poking around in this section but you can if you want to remove everyone’s right to have a look.

WSUS/SUP IIS Configuration
Ok for this section, I have to make the disclaimer that we are making changed to the Default ISS pools and that you should either know what you are doing or understand the concepts of what is being done, if you do not know what these settings do or the impact that they will have in your environment then you should either not do this or research them. If this is a test environment then you should be safe however if this is production then please consult your IIS admin or web admins.
That being said let’s proceed 🙂 .
- open Information Services (ISS) Manager

- Select the Application Pools on the left pane and then the WSUS application pools in the main pane right click and go into the settings

- Change the Queue Length to 2,000, this is not optimal but a good starting point (this can be changed later).

- Change Private Memory Limit (KB) to 0 – (no limit) then click on OK

- Back in IIS, select your Server on the left, and hit Restart on the right.

Personally, I like to restart the server at this point, as it shouldn’t be in service yet anyway, and its just nice to have a clean slate to continue with the configurations.
Setting up SCCM SUP Configurations
- Open System Center Configuration Manager
- Navigate to Administration>Site Configuration>Server and Site System Roles
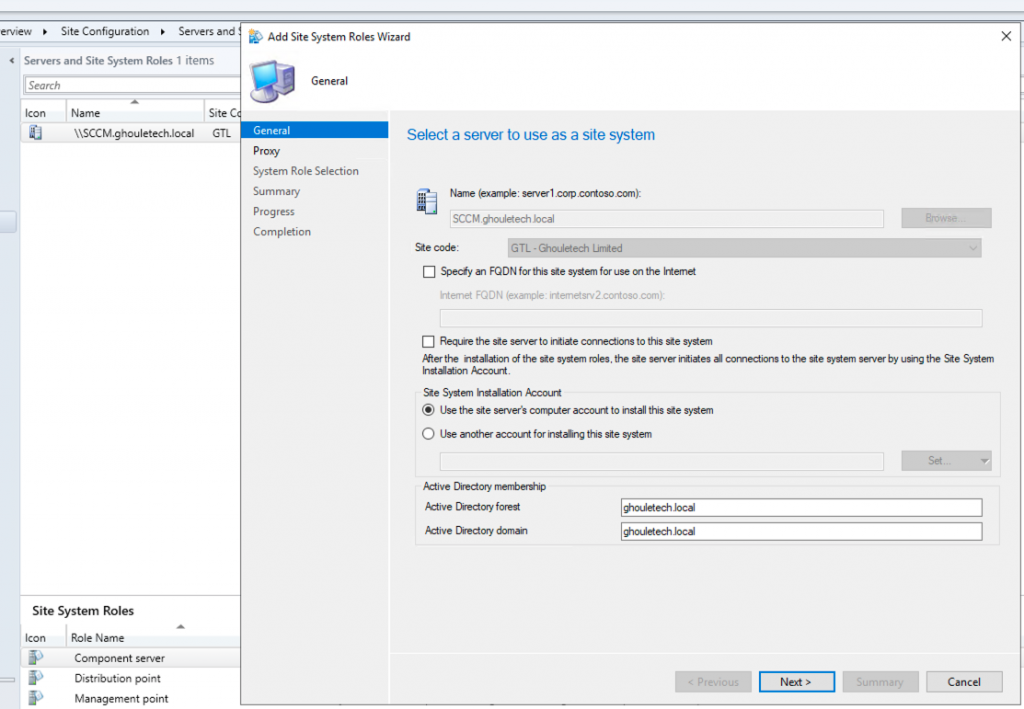
- Right-click the Site Server you wish to install the Software Update Role onto, and select Add Site System Roles

- For the first window, nothing to configure so you can select Next
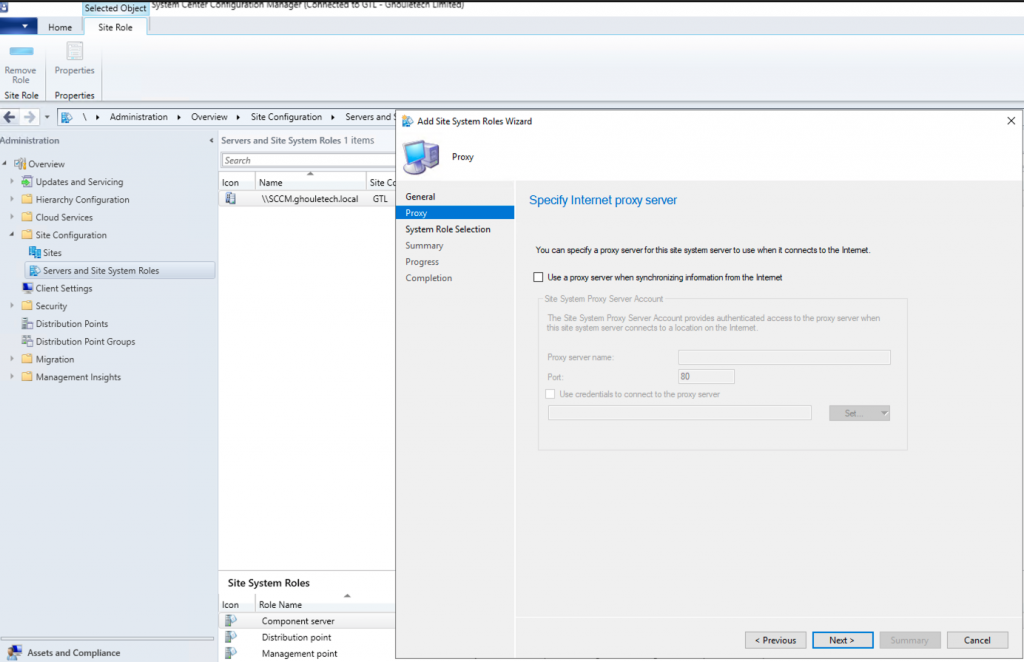
- On the next window, if you have a proxy that required authentication then add this in now, if not just click next
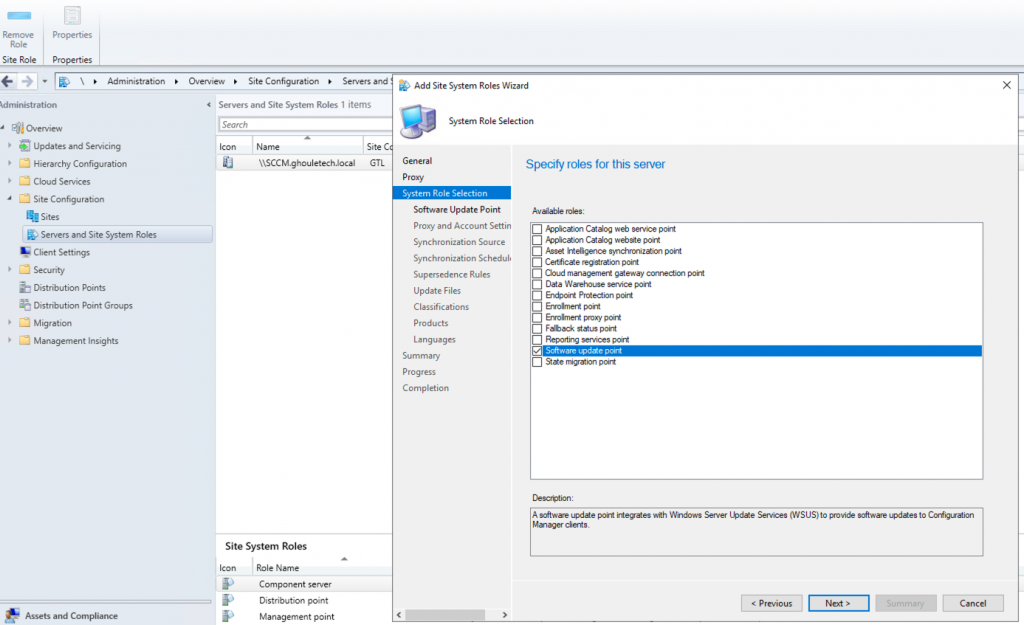
- On the next window, click the Software Update Point and then next
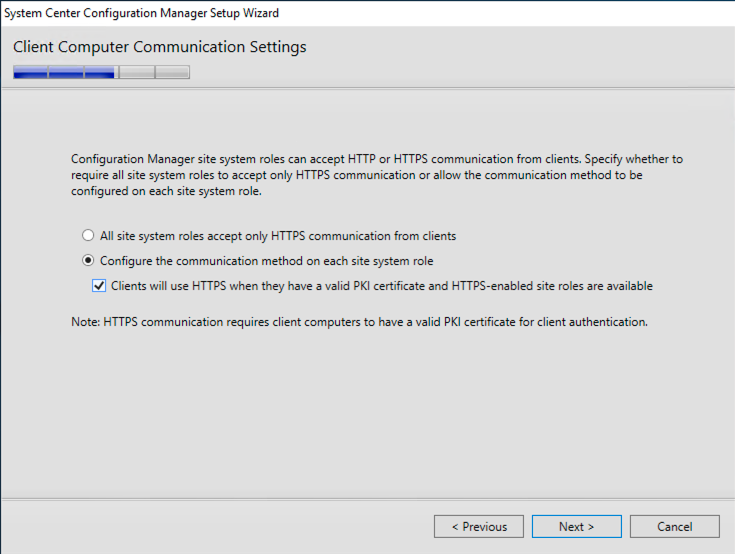
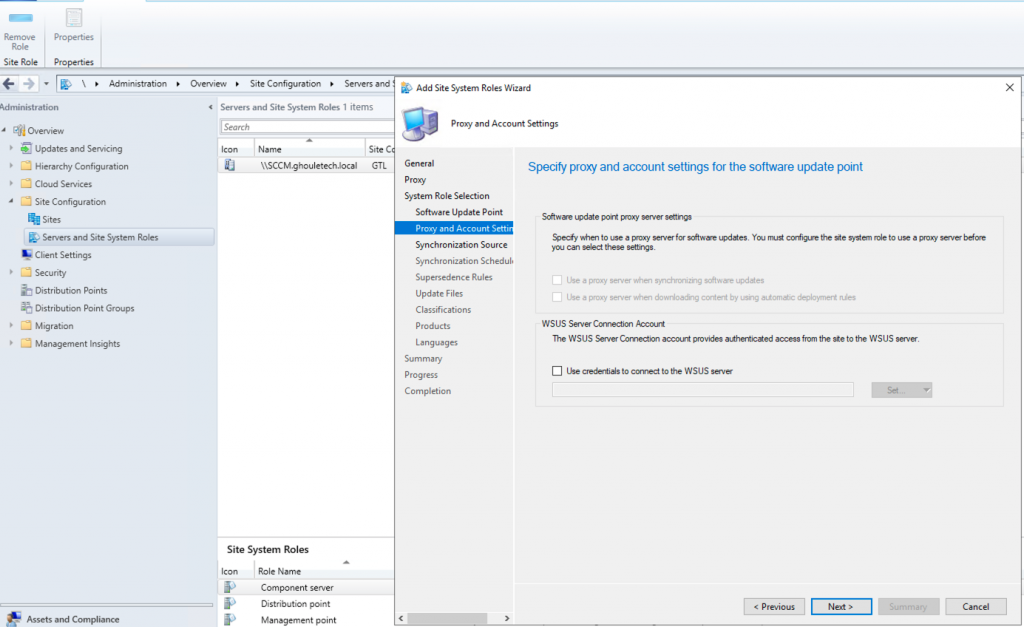
- On the next page, this is really up to you to decide on the level that fits your environment, for me I always ensure that it is set as the default as this allows for the maximum compatibility, I also do not enable SSL only traffic (at this stage) but I do allow CMG access (because I will be setting this up soon 😉 ).

- Now the next sections are new to 1810 or at least I haven’t seen them before but this next page is for the Proxy Account if you need to fill this in then do so, if not just click next
Now we need to specify a schedule to synchronize our Software Update point, with, but for now, if you’re following along,
- I’d advise you also select to Alert when synchronization fails on any site in the hierarchy.

- on the supersedence rules, I would leave these set to the defaults but enable the WSUS cleanup

- For the Download update pack files, I leave this as the default

NOTE: – ok some more weirdness on the configurations from me, but trust me, this is going to save you a hell of a long time 🙂 .
- Untick All Classifications. IMPORTANT NOTE and goes against every technical person to not go over something but this will save time in the setup process.

- Under the Products section, leave this default. Don’t be tempted to go through selecting everything you want to patch even if you wanted to, you’ll notice the lack of certain Products. Leave it default, move on.

- Select the languages you require here. Select Next.

- Review the brief summary, and click Next to begin the installation.

- Finally, if successful you will see green ticks, click Close.

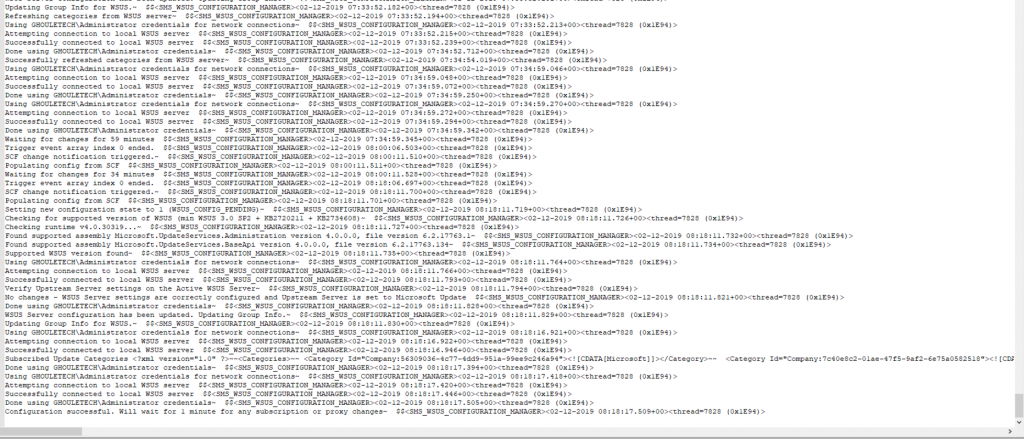
- Now to review the installation. Navigate to the log below on the Site Server.
- C:\Program Files\Microsoft Configuration Manager\Logs\WCM.log
Eventually you will get a green tick for the Sync, if you don’t feel like watching the WCM.log this will show that the Service is ready to be configured.
ok so now we have gotten this far and not given up all hope, we can do the first sync, this won’t take very long at all (because we have not asked it to do anything yet 😉 ).
- Go to Software Library/Software Updates/All Software updates and then on the top bar click Synchronise Software updates

- Hopefully you will get the Config Manager Warning of where you can see the logs for the process, click Yes to proceed

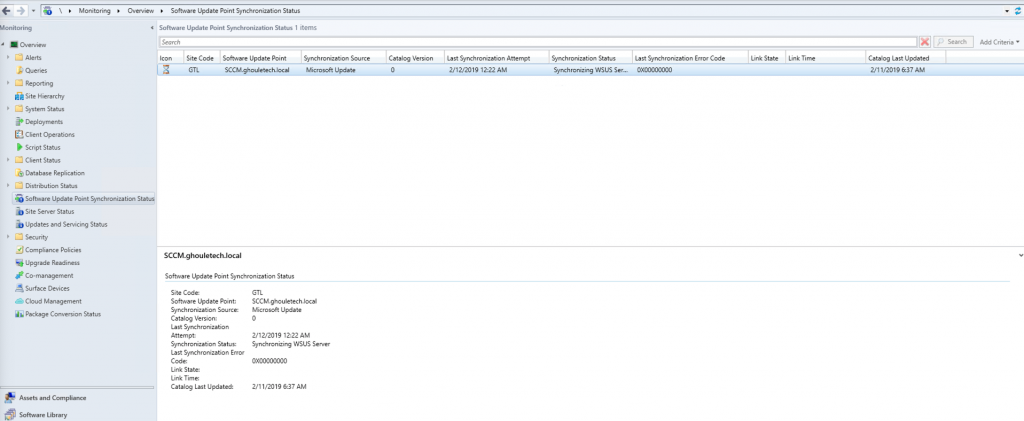
- This first Sync should only take a couple minutes. We can review its progress it two places; In the GUI under Monitoring>Software Update Points Synchronization Status

- Or for more detail, in the log file below;
- C:\Program Files\Microsoft Configuration Manager\Logs\Wsyncmgr.log

“Warning: Request filter does not contain any known classifications. Sync will do nothing.”
Remember we advised to not to tick and Classifications?
So what have we just done?
Remember the lack of Products selectable, notably Windows 10 & Server 2016 and as of Oct 2018 Windows Server 2019.
- Now we’ve confirmed SCCM and WSUS are communicating with each other, we can configure the Products;
- Navigate to Administration>Sites
- Right-click your Site and select Configure Site Components>Software Update Point
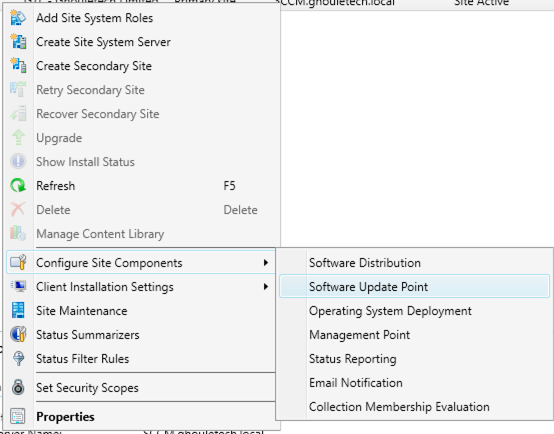
- Select the Products tab and scroll down.
- Windows 10 and Server 2016 and Server 2019 are now available.
- Select all Products you wish patching in your environment.

- Select the Classifications tab and tick the ones you require.

- Select the Update Files tab
- Select Download full files for all approved updates
- This will allow a much smaller cumulative update package to be deployed to your clients.

- Once you’re happy with your final configuration changes, Click OK and close the open window.
- Once you do this, a log will be made as per below which notes the changes that have been made. It was at this point CMTrace failed to open my log files 🙁 .
- It is now a requirement to Sync the changes again. Navigate to Software Library>Software Updates>All Software Updates. Select Synchronise Software Updates. Select Yes when prompted

- And again, monitor its progress.. This time, expect it to take some time.. likely at least a couple of hours.
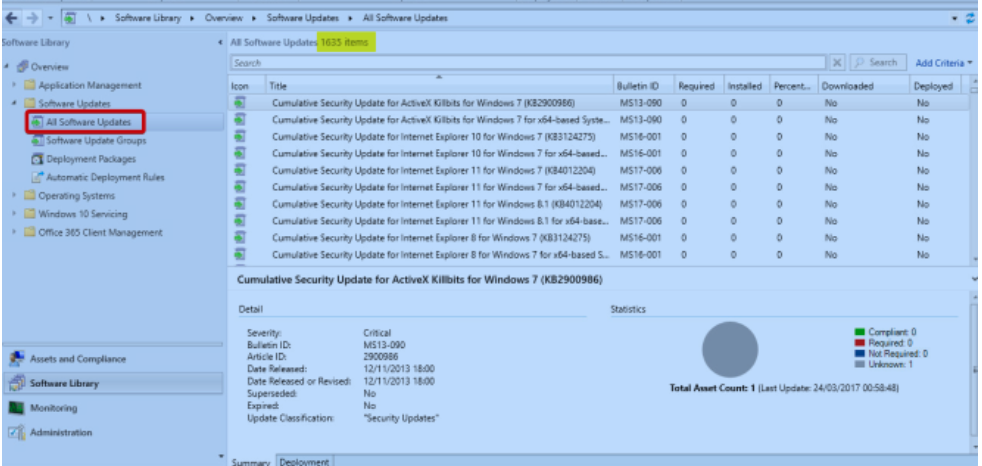
- Once the Sync is complete, you can return to Configuration Manager. Navigate to Software Library>Software Updates>All Software Updates You will now be able to see the list of available updates
Conclusion
So that was the end of Part 3, remember the document that I wrote for the customer recently, that was the first 56 Pages. the rest is configuration of the services and administration tasks as well as PKI stuff. these bits will come in time but I want to tick off a few of the other things on my list before continuing with SCCM anymore, especially as for two of them I need to set up a trial Azure account so that I can do the OMS and CMG portions of the setup.